—orig. developed through MOICANNA
– originally developed through MOICANNA
Cannabis requires three primary nutrients to grow healthily. These macronutrients are crucial for different stages of growth.
| Calcium | Ca | Role | Strengthens cell walls, promoting robust structure. |
| Magnesium | Mg | Role | Central to chlorophyll production and photosynthesis. |
| Iron | Fe | Role | Essential for enzyme function and chlorophyll synthesis. |
| Zinc | Zn | Role | Facilitates growth hormones and enzyme activation. |
| Copper | Cu | Role | Enhances reproductive processes and overall vitality. |
| Boron | B | Role | Vital for cell wall formation and nutrient transport. |
| Molybdenum | Mo | Role | Aids in nitrogen metabolism and enzymatic functions. |
Micronutrients are required in trace amounts but are just as critical for plant health.
| Nitrogen | N | Role | Vital for vegetative growth; promotes leaf and stem development. |
| Phase | Early to Late Vegetation. | ||
| Phosphorus | P | Role | Essential for root health, flower formation, and energy transfer. |
| Phase | Pre-flowering and Blooming. | ||
| Potassium | K | Role | Enhances water uptake, photosynthesis, and disease resistance. |
| Phase | Throughout the plant’s lifecycle. |
N-P-K refers to the three primary macronutrients found in fertilisers: Nitrogen (N), Phosphorus (P), and Potassium (K). Understanding their role is crucial for providing cannabis plants with the right nutrients at the right time.
The optimal N-P-K ratios may vary slightly depending on the strain and the specific needs of your plants. The following values are generally considered ideal for each growth stage:
| Phase | N-P-K | Key focus |
| Seedling | 2-1-2 | Gentle root and early foliage development. |
| Early Vegetation | 3-1-3 | Promotes rapid leaf and stem growth. |
| (Main) Vegetation | 4-2-3 | Supports robust plant structure and health. |
| Late Vegetation | 4-2-3 | Prepares plant for flowering while maintaining growth. |
| Pre-Flowering | 3-3-3 | Balances vegetative and reproductive energy. |
| Blooming | 1-4-4 | Focuses on bud development and resin production. |
| Ripening | 0-5-6 | Enhances flavour, aroma, and final density. |
| Flush | 0-0-0 | Removes residual nutrients and salts from the growing medium. |
Understanding which nutrients and additives to use is crucial for plant health. Here’s a guide to key nutrients and supplements.
| Category | Function |
| Base Nutrients | Support basic needs during each growth phase. |
| Root Boosters | Encourage strong root systems. |
| Bloom Boosters | Boost flower production. |
| Cal-Mag | Addresses calcium and magnesium deficiencies. |
| Mycorrhizae | Enhance nutrient absorption and protect from pathogens. |
Smart irrigation systems can be linked to a mobile app, allowing you to adjust schedules remotely and get notifications if there’s an issue with water flow or nutrient levels.
| Feature | Organic | Synthetic | ||
| Source | Natural (manure, plant residues) | Chemical composition | ||
| Absorption | Slow release | Immediate | ||
| Environmental | Eco-friendly impact | Risk of pollution if overdosed | ||
| Cost | Higher initial cost | Lower purchase cost | ||
| Examples | Compost, guano, seaweed | Urea, potassium, sulfate, nitrates |
Proper feeding varies with the plant’s growth phase. Tailoring nutrient solutions and ratios ensures optimal plant development.
| Phase | Key Nutrients | |
| Seedling | Minimal nutrients; root boosters are beneficial. | |
| Tip | Use diluted nutrient solutions (25–50% strength). | |
| Early Vegetation | High nitrogen with some phosphorus and potassium. | |
| Tip | Gradually increase feeding; monitor for nitrogen toxicity (dark green, claw-like leaves). | |
| (Main) Vegetation | Balanced but nitrogen-heavy blends. | |
| Tip | Regularly check plant response and adjust feeding levels. | |
| Late Vegetation | Maintain nitrogen but introduce higher potassium. | |
| Tip | Transition slowly to pre-flowering nutrients to avoid stress. | |
| Pre-Flowering | Balanced nutrients; phosphorus uptake begins to rise. | |
| Tip | Watch for the stretch (rapid vertical growth). | |
| Blooming | High phosphorus and potassium; reduce nitrogen. | |
| Tip | Introduce bloom boosters and Cal-Mag to support resin production. | |
| Ripening | Minimal nitrogen, higher potassium for bud density. | |
| Tip | Start flushing to remove nutrient residues. | |
Proper fertiliser mixing is essential to ensure that plants receive the correct balance of nutrients at every growth stage, avoiding issues such as nutrient lockout, pH imbalances, or chemical precipitations. Follow this detailed guide for accurate and consistent nutrient solutions.
| 1. | Start with clean water |
|
|||
| 2. | Follow the correct order | Add nutrients in a specific order to prevent chemical precipitation and ensure proper mixing: | |||
| 1. | Silica | → | |||
| → | 2. | Base Nutrients (A & B) | → | ||
| → | 3. | Micronutrients | → | ||
| → | 4. | Additives | |||
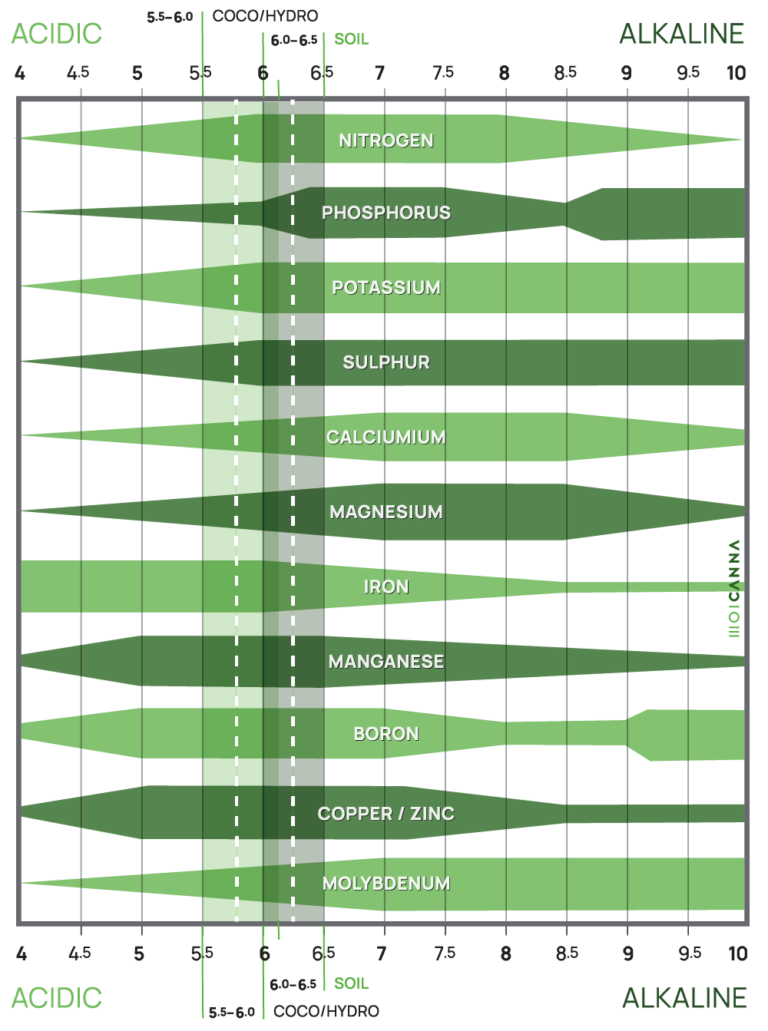
| 3. | Adjust pH | Soil: 6.0–6.5; Coco Coir: 5.7–6.2; Hydroponics: 5.5–6.0. | |||
| 4. | Oxygenate the solution | Use air stones to oxygenate the solution, especially in hydroponic systems. | |||
Changing fertilisers during cultivation is not recommended unless absolutely necessary. Consistency in nutrition ensures plant health, prevents imbalances, and minimises stress. However, situations such as issues with the current fertiliser, depleted supplies, or better alternatives becoming available might necessitate a change. A proper approach is crucial to avoid damage or reduced yield.
| Challenges and risks |
|
| Smooth transition to a new fertiliser brand |
|
| When to Change Fertiliser Brands |
|
Autoflowering plants are generally smaller in size and complete their lifecycle faster, meaning they require tailored feeding strategies.
| 1. | Lighter feeding (compared to photoperiod plants) | Autoflowering plants are more sensitive to overfeeding (nutrient burn). Start with 25–50% of the recommended dosage for photoperiod plants and gradually increase. |
| 2. | Faster phase transitions | Autoflowering varieties quickly transition from vegetative growth to flowering. Therefore, the feeding schedule must adapt faster, with a greater focus on bloom nutrients. |
| 3. | Consistent lighting schedule | Feeding should account for prolonged photosynthesis due to consistent lighting schedules of 18/6 or 20/4 throughout the entire cycle. |
| 4. | Stress management | Avoid high-stress training (HST) techniques and prioritise gentle methods like low-stress training (LST), as these plants have limited time to recover. |
| Vegetative Phase | (weeks 2–3) | |
| Recommended nutrients: | Increase Nitrogen (N) for leaf development. Use bloom nutrients in small doses. | |
| EC/PPM: | EC: 0.4–0.6 mS/cm and PPM: 200–300 (500 scale) or 280–420 (700 Scale). Start with a mild feeding regimen (1/4 or 1/2 of the recommended dose) and monitor plant growth. | |
| Growth Phase | (transition phase). This phase may begin as early as the 3rd week. | |
| Adjust nutrition: | Gradually increase Phosphorus (P) and Potassium (K), while reducing Nitrogen (N). | |
| EC/PPM: | EC: 0.8–1.2 mS/cm and PPM: 400–600 (500 scale) or 560–840 (700 Scale). Closely monitor plants for signs of stress or overfeeding and adjust accordingly. | |
| Flowering Phase | (weeks 4–8) | |
| Recommended nutrients: | High concentrations of Phosphorus (P) and Potassium (K). | |
| EC/PPM: | EC: 1.2–1.6 mS/cm and PPM: 600–800 (500 scale) or 840–1120 (700 Scale). Gradually increase nutrient concentration to support flower development but avoid overfeeding. | |
| Flushing | (final week). During the last week or 10 days, flush the substrate with clean water to remove accumulated salts and preserve the flavour and quality of the buds. | |
| EC/PPM: | EC: 0.0–0.2 mS/cm and PPM: 0–100 (500 scale) or 0–140 (700 Scale). | |
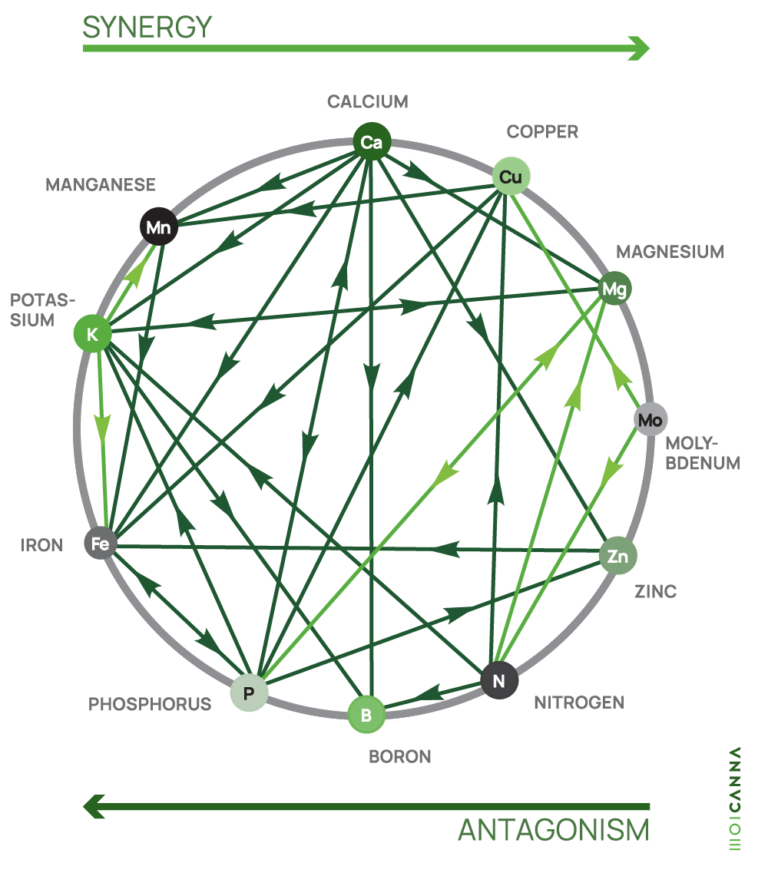
The Mulder’s chart illustrates the complex interactions between essential plant nutrients, highlighting two main relationships: competition and synergy. These interactions influence how cannabis plants absorb and utilise nutrients, making the chart an essential tool for fine-tuning fertilisation strategies.
| Competition | Excessive levels of one nutrient can inhibit the uptake of another. For example: |
|
|
| Synergy | Balanced levels of certain nutrients can enhance the absorption and utilisation of others. For example: |
|
The Mulder’s chart illustrates the complex interactions between essential plant nutrients, highlighting two main relationships: competition and synergy. These interactions influence how cannabis plants absorb and utilise nutrients, making the chart an essential tool for fine-tuning fertilisation strategies.
| Antagonistic | Nutrient | Synergistic |
| K | N | S, Mg, Mo |
| Fe, Ca, Zn, Cu, K | P | Mg |
| Ca, Mg, B, N, P | K | Fe, Mn |
| Mg, Zn, Fe, Mn, B, P, K, S | Ca | None |
| K, Ca | Mg | N, P |
| Ca, Cu, Mo | S | Mn, N |
| Cu, Mn, P, Ca, Zn | Fe | K |
| Fe, P, Ca | Zn | None |
| Mn, N, P, S, Fe | Cu | Mo |
| Ca, Fe, Cu | Mn | K, S |
| N, K, Ca | B | None |
| S | Mo | N, Cu |
The timing of nutrient delivery plays a pivotal role in cannabis plant health, nutrient uptake, and yield. Aligning your feeding schedule with the plant’s biological clock and environmental conditions ensures that nutrients are absorbed efficiently while minimising risks like root stress or mould. Here’s a breakdown of best feeding practices based on the time of day.
| Morning | WHY? | Cannabis plants are metabolically active after lights turn on (or sunrise), making mornings the ideal time for nutrient uptake. |
| ADVANTAGES |
|
|
| CHALLENGES |
|
|
| BEST PRACTICES |
|
|
| Midday | WHY? | Convenient and avoids the hottest or most humid parts of the day for outdoor grows. |
| ADVANTAGES |
|
|
| CHALLENGES |
|
|
| BEST PRACTICES |
|
|
| Evening | WHY? | Offers flexibility, but less ideal for plant health due to reduced metabolic activity at night. |
| ADVANTAGES |
|
|
| CHALLENGES |
|
|
| BEST PRACTICES |
|
| Root feeding | Morning or early midday Supports nutrient uptake during active metabolism. |
| Foliar feeding | Early morning or evening Avoid direct light to prevent leaf burn; ensure leaves dry before dark. |
Plant circadian rhythms: Nutrient uptake is most efficient during the plant’s active daylight cycle.
| Indoor grows |
|
Outdoor grows |
|
Understanding the Shelf-life and storage requirements of fertilisers is crucial for maintaining their effectiveness and ensuring plant health. Fertilisers, whether organic or synthetic, can degrade over time, leading to reduced potency, contamination risks, or even harm to your plants. Here’s what you need to know about their longevity and proper handling.
| Type | Sealed | Opened | Mixed |
| Synthetic Liquid | 5–10 years if stored correctly |
1–2 years cap is tightly sealed |
24–48 hours dispose after |
| Synthetic Granular | Indefinite in a cool, dry place |
Several years without moisture |
n/a dissolved on demand |
| Organic Liquid | 2–3 years unopened |
6–12 months potential microbial activity |
Use immediately after mixing |
| Organic Dry | 3–5 years | 1–2 years if kept moisture-free |
n/a |
By understanding the lifespan and proper storage methods of fertilisers, growers can minimise waste, reduce risks, and ensure consistent plant nutrition. Whether using synthetic or organic options, proper care extends the utility and effectiveness of your supplies, protecting both your investment and your cannabis plants.
| Nutrient / pH | 5.5 | 5.6 | 5.7 | 5.8 | 5.9 | 6.0 | 6.1 | 6.2 | 6.3 | 6.4 | 6.5 | 6.6 | 6.7 | 6.8 | 6.9 | 7.0 |
| Nitrogen (N) | 85 | 85 | 86 | 87 | 88 | 89 | 90 | 91 | 91 | 92 | 92 | 93 | 94 | 95 | 96 | 97 |
| Phosphorus (P) | 60 | 61 | 62 | 63 | 64 | 65 | 67 | 68 | 70 | 72 | 73 | 75 | 76 | 78 | 79 | 80 |
| Potassium (K) | 95 | 96 | 97 | 98 | 99 | 100 | 100 | 100 | 100 | 99 | 98 | 97 | 96 | 95 | 94 | 93 |
| Calcium (Ca) | 70 | 71 | 72 | 73 | 74 | 75 | 76 | 77 | 78 | 80 | 81 | 82 | 83 | 84 | 85 | 86 |
| Magnesium (Mg) | 75 | 76 | 77 | 78 | 79 | 81 | 82 | 83 | 84 | 85 | 86 | 87 | 88 | 89 | 90 | 91 |
| Iron (Fe) | 60 | 61 | 62 | 63 | 64 | 65 | 67 | 68 | 69 | 70 | 71 | 72 | 73 | 74 | 75 | 76 |
| Manganese (Mn) | 65 | 66 | 67 | 68 | 69 | 70 | 71 | 72 | 74 | 75 | 76 | 77 | 78 | 79 | 80 | 81 |
| Boron (B) | 60 | 62 | 64 | 66 | 68 | 70 | 71 | 73 | 75 | 77 | 78 | 80 | 82 | 84 | 85 | 87 |
| Copper (Cu) | 70 | 72 | 73 | 74 | 75 | 76 | 77 | 78 | 79 | 80 | 81 | 82 | 83 | 84 | 85 | 86 |
| Zinc (Zn) | 65 | 67 | 69 | 71 | 73 | 75 | 76 | 77 | 78 | 79 | 80 | 81 | 82 | 83 | 84 | 85 |
| Molybdenum (Mo) | 85 | 87 | 88 | 89 | 90 | 91 | 92 | 93 | 94 | 95 | 96 | 97 | 98 | 99 | 100 | 100 |
| Nutrient / pH | 5.5 | 5.6 | 5.7 | 5.8 | 5.9 | 6.0 | 6.1 | 6.2 | 6.3 | 6.4 | 6.5 | 6.6 | 6.7 | 6.8 | 6.9 | 7.0 |
| Nutrient / pH | 5.5 | 5.6 | 5.7 | 5.8 | 5.9 | 6.0 | 6.1 | 6.2 | 6.3 | 6.4 | 6.5 | 6.6 | 6.7 | 6.8 | 6.9 | 7.0 |
| Nitrogen (N) | 85 | 86 | 87 | 88 | 89 | 90 | 91 | 92 | 93 | 94 | 95 | 96 | 97 | 98 | 99 |
100 |
| Phosphorus (P) | 60 | 61 | 62 | 63 | 64 | 65 | 67 | 68 | 69 | 71 | 73 | 75 | 76 | 77 | 78 |
79 |
| Potassium (K) | 95 | 96 | 97 | 98 | 99 | 100 | 100 | 100 | 100 | 99 | 98 | 97 | 96 | 95 | 94 | 93 |
| Calcium (Ca) | 70 | 72 | 73 | 74 | 75 | 77 | 78 | 79 | 81 | 82 | 83 | 85 | 87 | 88 | 90 | 92 |
| Magnesium (Mg) | 75 | 76 | 77 | 78 | 79 | 81 | 82 | 83 | 85 | 86 | 87 | 88 | 89 | 90 | 91 | 92 |
| Iron (Fe) | 60 | 61 | 62 | 63 | 64 | 65 | 66 | 67 | 69 | 71 | 73 | 75 | 77 | 79 | 81 | 83 |
| Manganese (Mn) | 70 | 72 | 73 | 74 | 75 | 76 | 77 | 79 | 80 | 81 | 83 | 84 | 85 | 86 | 87 | 89 |
| Boron (B) | 65 | 66 | 67 | 68 | 69 | 71 | 72 | 74 | 75 | 76 | 77 | 78 | 80 | 81 | 82 | 83 |
| Copper (Cu) | 75 | 76 | 77 | 78 | 79 | 81 | 82 | 83 | 84 | 85 | 87 | 88 | 89 | 90 | 91 | 92 |
| Zinc (Zn) | 70 | 71 | 72 | 73 | 74 | 75 | 77 | 78 | 79 | 80 | 81 | 82 | 83 | 84 | 85 | 87 |
| Molybdenum (Mo) | 90 | 91 | 93 | 94 | 95 | 96 | 97 | 98 | 99 | 100 | 100 | 100 | 100 | 100 | 100 | 100 |
| Nutrient / pH | 5.5 | 5.6 | 5.7 | 5.8 | 5.9 | 6.0 | 6.1 | 6.2 | 6.3 | 6.4 | 6.5 | 6.6 | 6.7 | 6.8 | 6.9 | 7.0 |
Morning is ideal, as plants are metabolically active, and water evaporates throughout the day, reducing the risk of mould.
For soil, aim for 6.0–6.5; for coco 5.7–6.2 and for hydroponics, maintain a pH of 5.5–6.0.
You can, but it’s less efficient because plant metabolism slows, and the risk of mould increases.
Lift the pot to check if it feels light and inspect the substrate surface for dryness.
Root feeding delivers nutrients to the roots, while foliar feeding is applied to leaves for quick absorption.
Early morning or evening to avoid sunburn.
Water every 2–3 days, depending on plant size, substrate, and environmental conditions.
Humidity rises at night, potentially leading to mould or pest issues if plants don’t dry in time.
Yes, flowering plants require more nutrients and water, but avoid overwatering.
Water in the morning to prevent stress from midday heat and monitor weather conditions.
Plants are metabolically active after sunrise, optimising nutrient absorption and reducing mould risks.
Spray early morning or evening when temperatures are cooler, and light is less intense.
Maintain pH at 6.0–6.5 for soil, 5.7–6.2 for coco, and 5.5–6.0 for hydroponics.
Plants absorb nutrients more effectively during the light cycle when metabolism is at its peak.
Humidity increases at night, leading to mould or fungal infections if plants don’t dry.
Intense sunlight and heat can stress plants, reducing nutrient uptake and causing water loss.
Check regularly—ideally once a week—to detect nutrient build-up or imbalances early.
Ideal root zone temperatures (20–24°C) ensure maximum absorption and root health.
Automate irrigation during light hours and monitor solution temperature consistently.
Use pH-balanced water (EC 0.0–0.3) and apply 2–3 times the pot’s volume to remove salts without overwatering.
Νοταε
Topics
NPK, macronutrients, micronutrients, fertiliser, Mulder's Chart, feeding
Focus Keyword
cannabis nutrients NPK fertiliser
Description
NPK ratios, Mulder's Chart, feeding schedules, organic vs synthetic — everything that feeds your plant, explained so you can make informed decisions at every growth phase.

Join early.
Keep the archive open.
The VADEMECUM is becoming a living archive of guides, tools, notes and practical plant knowledge.
Free member access. Join early. Keep the archive open.

Join early.
Keep the
archive open.
The VADEMECUM is not just a book anymore. It is becoming a living archive of guides, tools, notes and practical plant knowledge.
Free member access. Join early. Keep the archive open.
The VADEMECUM is becoming a living archive of practical plant knowledge.
Free member access.